Both Azure and AWS provide their own cloud native tools when it comes to Infrastructure-as-Code (IaC); In Azure – Azure Resource Manager and in AWS – CloudFormation. Terraform however, is an open-source IaC software tool that is cloud agnostic, which I consider is one of its greatest strength apart from its modularity. Being a proponent of it, here’s a blog post of my journey in building an Azure infrastructure using Terraform, integrated with Azure DevOps CI/CD Pipelines.
Architecting an Azure Infrastructure using Terraform
There are a couple of pointers to consider when it comes to architecting a robust infrastructure; High availability, Security and Scalability. An Azure landing zone is a conceptual architecture that represents the destination of an organization’s cloud adoption journey. For todays blog post, we will not be looking at deploying a complete landing zone filled with security policies and role assignments, but rather a Hub-and-Spoke architecture that comprises of key Azure resources required in building a greenfield environment.
This architecture consists of 3 resource groups, 1 acting as the Hub and 2 as the Spokes, with their own virtual networks and virtual machines. For security, an Azure Firewall to filter North-South (traffic flowing in and out of a datacentre) and East-West (traffic between or within datacentre) traffic. At the virtual machine layer, Active Directory Domain Services (ADDS) is deployed at the hub, with the spoke virtual machines domain-joined. Internet Information Services (IIS) is deployed in the spoke virtual machines, which act as web servers. For High availability of the web servers, an Application Gateway is used to load balance HTTP/HTTPS traffic between one another. For connectivity to on premise via Site-to-Site or Point-to-Site, a Virtual Network Gateway is deployed at the hub.
Now that we have an idea of how the end state would look like, lets look at leveraging Terraform to provision the infrastructure. You should start with considering how will you manage your state file. Terraform stores information about your infrastructure in a state file, and it keeps track of the resources provisioned by your configuration. Best practice is to have it stored in a secured remote data store, which also allows collaboration between team members. For this context, we will be storing our remote state file in an Azure Blob Storage.
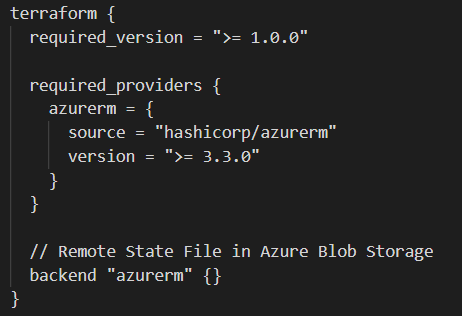
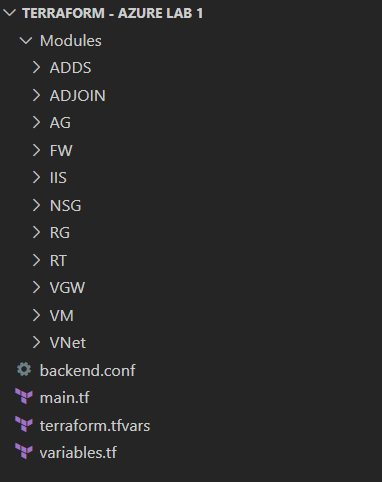
Notice that the backend “azurerm” block does not have the storage account name and key defined which is required to initialize the remote state file, as those variables will be defined under the Azure DevOps Pipeline at a later stage. As for code structure, always use Terraform modules to organize your configuration, making it easier to understand, update and navigate. Think of it as segmenting your infrastructure into smaller building blocks. For this context, I have created modules for resource group, virtual network, virtual machine, etc.
Most of the time, Terraform is smart enough that it automatically handles the resource dependencies, like deploying the virtual network and network interface before the virtual machine. In some cases for complex architecture involving many different types of azure resources, you will need to create explicit dependencies using the depends_on argument.

Link to code repository : https://github.com/chunhong96/Terraform
Integrating Terraform with Azure DevOps Pipeline
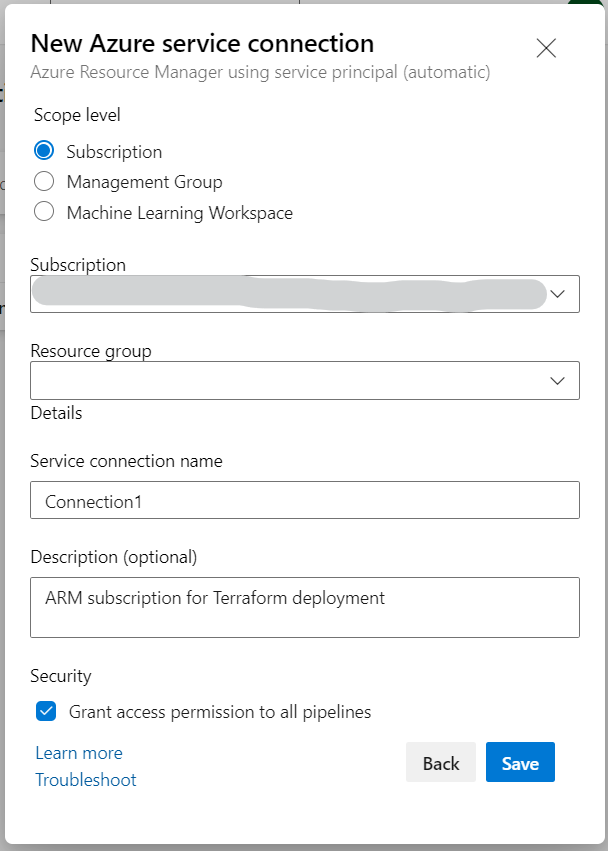
Start off with creating a new Azure service connection at the Project Settings > Service Connection. Select + New service connection select Azure Resource Manager. Under Authentication method, select Service principal (automatic) which basically creates an identity in Azure AD for access to resources scoped at either the Subscription or Management Group level.
Once you have your Service connection created, import your Terraform configuration files to Azure DevOps Repo using any source code repository tool of your choice, like Git. You can share your work on a local Git repo branch by uploading your changes to a remote repo for external collaboration.
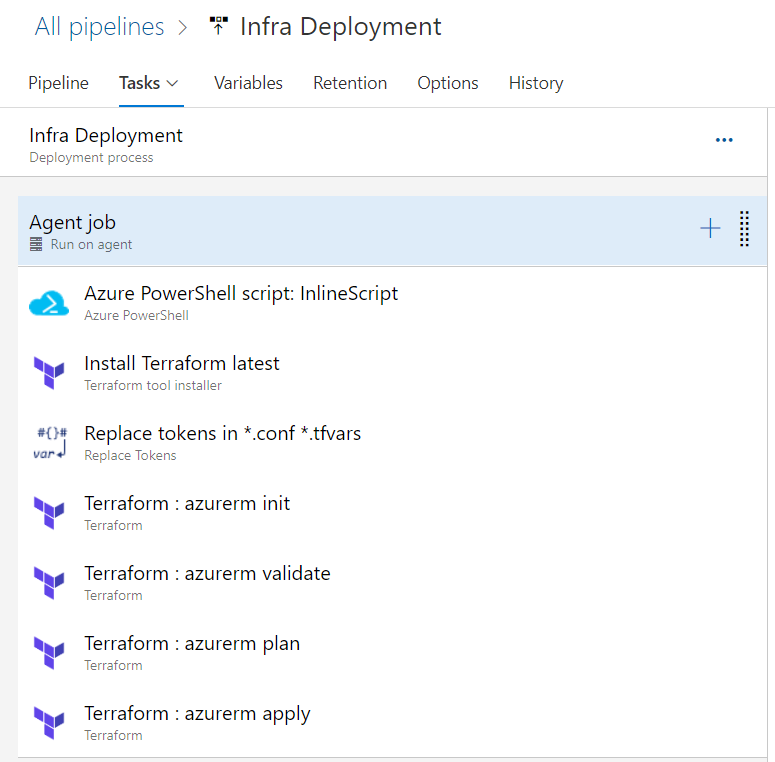
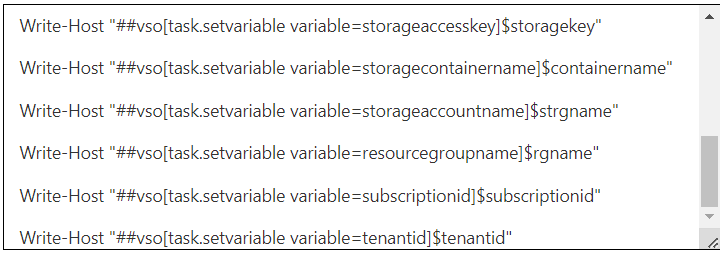
Here’s a view of the tasks I have included in an Azure Pipeline for Infra Deployment. An Inline PowerShell script is used to provision an Azure Storage Account for the purpose of storing the remote Terraform State file. It appends a random 4-digit number at the end of the name of the storage account to fulfill the unique name required within Azure. By invoking logging commands, we can map values needed for “terraform init” command to Azure DevOps stage variables without needing any kind of hardcoding; Resource Group, Tenant ID, Subscription ID, Storage account name, key and container details.
The Terraform tool installer task acquires a version of Terraform from the internet and prepends it to the path of the Azure Pipelines Agent. It is a good idea to specify the current version that ensures your deployment runs without any issues, also known as version constraint. Terraform is always introducing new features with its latest release that might break your configuration, so you should stick to one that works.
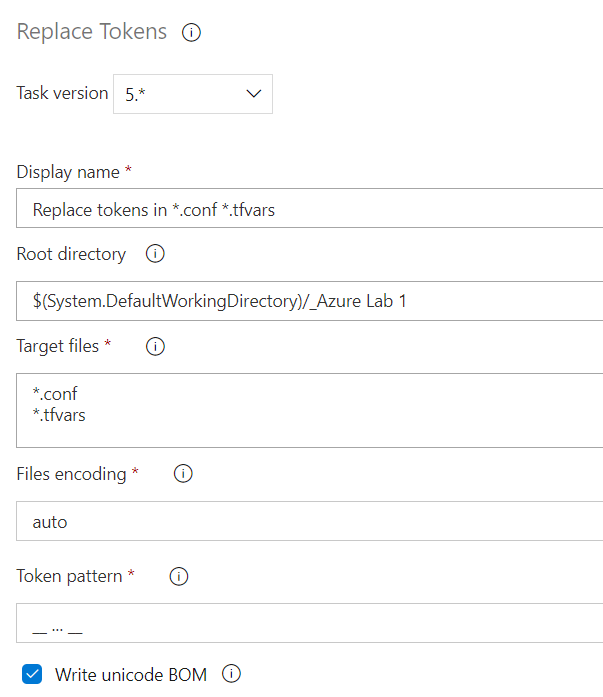
The Replace Tokens task checks your repository for any matching target files, and replaces any variables it finds based on a set token pattern. In this context, I have used a token pattern matching “__variable__” to be replaced with Azure Pipeline variables. This essentially eliminates the need to hardcode sensitive values (Subscription and Tenant IDs) directly into your tfvars and conf files. The remaining tasks are main Terraform primary workflow commands, as explained below.
Main commands:
init : Prepare and initialize your working directory
validate : Check whether the configuration is valid
plan : Show changes required by the current configuration
apply : Create or update infrastructure
That’s it! With all tasks in place, start running your Azure DevOps Pipeline by creating a release. Thank you for reading and stay tuned for more posts like this.